Normally, Windows will create these system restore points automatically before certain events, i.e., installing new software, updating a driver, installing Windows updates, etc. If none of these events occur, Windows will create a restore point every seven days. In terms of files, System Restore will save a copy of a file or folder when it is modified, but only when a restore point is created. You can then restore a previous version of the file or folder by simply right-clicking on the file or folder. Do not think of system restore as a backup solution for your files and folders because it is not nearly as robust as using Windows backup or a third-party backup program.
Enable System Restore
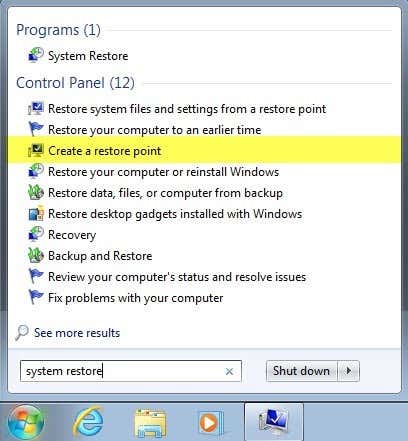
By default, System Restore should already be enabled on Windows unless it was turned off manually. To enable System Restore, we need to open the System Protection tab. You can do this in one of two ways. Note that the below instructions will work on Windows Vista, 7, 8 and 10. Click on the Start button and then type in system restore. You’ll probably get a couple of different options and the one you want to click on is Create a restore point.
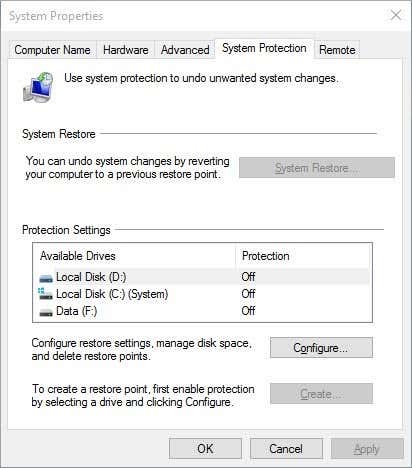
If System Restore is disabled, you’ll see Off listed in the Protection column for each partition on the hard drive.
Note that if your computer has multiple hard drives, you might see all of them listed under Protection Settings. Windows is normally installed under C: (System), so click on that to select it. Then click on the Configure button.
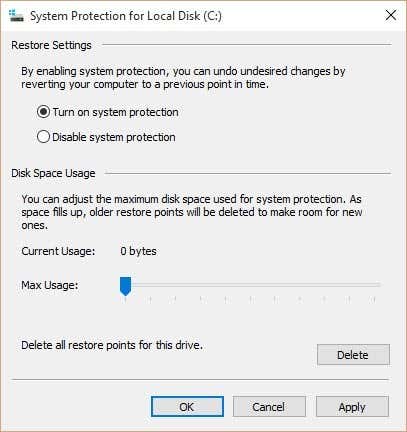
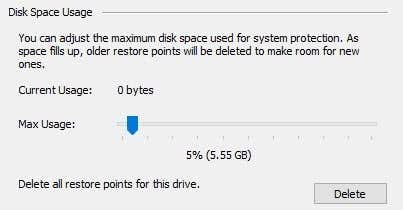
Click on the Turn on system protection radio button and then adjust the slider under Disk Space Usage to a value between 3 and 5 percent. Note that this value is going to be based on the size of the partition, not the size of the hard disk.
Recommended Disk Space Usage for System Restore
This means you might have a 1 TB hard drive, but split into a C and D partition. C is the system partition where Windows is installed and might only be 100 GB and the rest is on the D partition. If you enable System Restore on the C drive, then 3% will be 3 GB and 5% will be 5 GB. If you just have one huge C partition that is the size of the entire drive, then 3% of 1TB would be a whopping 30 GB, which is huge. In these types of cases, just set it to 1% or 2%.
Whatever percentage you use, just make sure the value is greater than 1000 MB or 1 GB as a minimum. Note that each GB will be able to hold anywhere from 1 to 3 restore points, depending on what you have on that partition. I recommend a value between 3 GB and 10 GB for system restore as it can prove to be very handy in certain situations. The more you have, the more likely you’ll be able to recover your computer from a problem. If you want to reduce the amount of space system restore is using on your system, just adjust the slider to a lower percentage. In addition, you can click the Delete button to remove all of the current restore points for the drive. This way, you can keep system protection enabled, but clear up some space if you are running out of hard disk space.
Disable System Restore
Disabling System Restore is just as easy as enabling it. Click on Start, type in system restore and then click on Create a restore point.
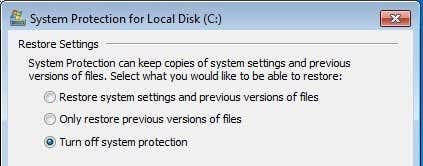
Select the hard drive you want to disable protection for in the list and then click Configure. On the next screen, select either Turn off system protection or Disable system protection.
Click OK and system restore will be turned off. You’ll also get a message stating that all restore points will be deleted from the disk and new ones will not be created. As previously mentioned, I do not recommend turning off system protection unless you know what you are doing and already have another backup solution in place. If you have any questions, feel free to post a comment. Enjoy!
